Welcome to Chapter Six:
Elliott Wave Trading Strategy
Things are going to be much more interesting from now on… I think a lot of you expected this part at the beginning, but I wanted you to fully understand each pattern before we start trading. We are going to start building the plan and entire strategy how to trade using Elliott Wave Theory.
Trading every single move (wave) is not always the best thing, it’s not like all the waves are going to give us that same exact risk reward. So let’s take a look at the chart below and see what we can trade.

On the chart above you can see that we have 2 group of waves Setup Waves (labeled purple) and Trading Waves (labeled Green). My entire trading carrier was built on this “Make Your Plan, Trade Your Plans” so to get enough time to be fully prepared we are going to use corrective waves 2,4,B as our setup waves and motive waves 3,5,C as our Trade waves.
Let’s jump now and see how to trade each wave.
How To Trade Wave 3
Wave 3 is the strongest wave and often call the “money wave” in our community, so defiantly we are going to be most focused to trade this wave. First let see what we know about this wave, 3ed wave appear in all four motive patterns and also we can see 3ed wave inside wave A (Zig-Zag correction only) and wave C (All simple corrections). We know that each 3ed leg will have 5 smaller sub-waves inside, only exception is Ending Diagonal where we have 3 smaller sub-waves.
Best Place to Enter Wave 3
We are going to use pullback in wave 2 as our setup wave, we are going to enter a trade at 50.0 and 61.8% of wave 1 (Use F.R.T to draw fib levels).
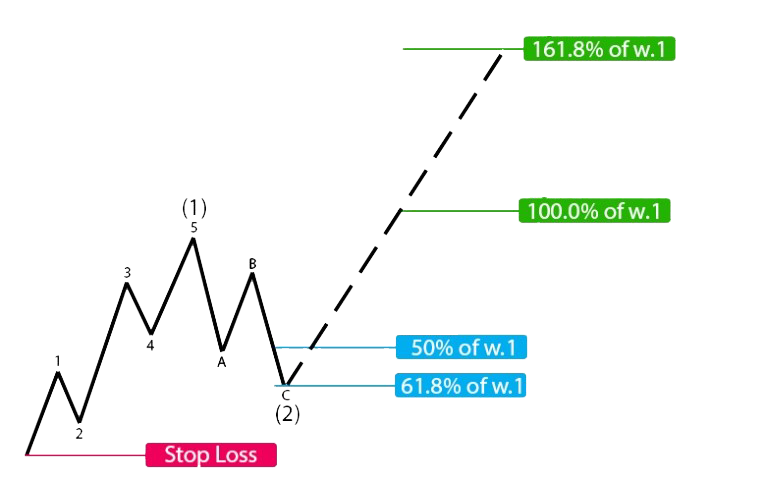
As you can see we have two entry points, so we are going to open two equal positions from each level (more about how to setup equal position below in Risk Management Part).
Best Place to Put Stop Loss In Wave 3
To place a stop, it’s going to be the best to use Elliott wave rules. We know that wave 2 must end above/below the starting point of wave 1, so we are going to use that starting point as our Stop Loss (Since you have FRT drawn for entry, you can just watch for 100% level)
Best Place to Put Targets In Wave 3
As we already say, wave 3 is usually the strongest wave and never the shortest, so we are going to aim for the 100% and 161.8% extension level of wave 1 as our targets.
How To Trade Wave 5
Wave 5 is not that strong wave, but defiantly this is the final option we have to catch that trend ride before pullback start.
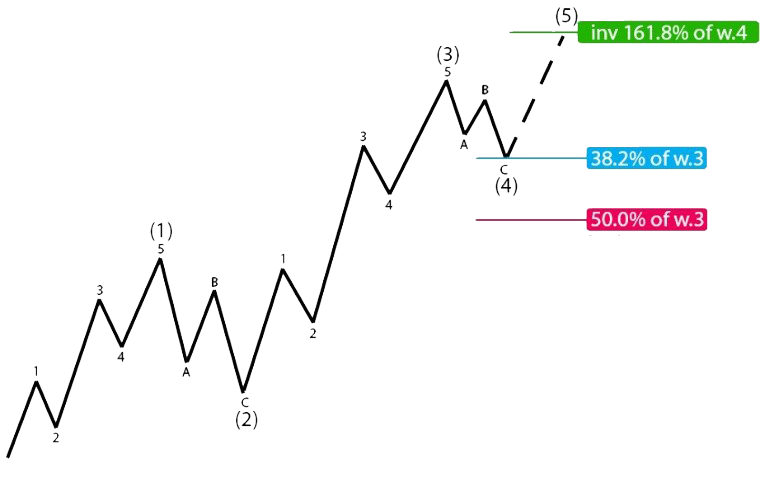
Best Place to Enter Wave 5
We are going to use pullback in wave 4 as our setup wave, we are going to enter a trade at 23.6 and 38.2% of wave 3 (Use F.R.T to draw fib levels).
Again for wave 5 trade we are going to open two equal positions from each level. If you like 1 entry point, use 38.2% (just using 23.6% won’t get you best risk reward in 50% of time)
Best Place to Put Stop Loss in Wave 5
Wave 4 shouldn’t test wave 2 territory according to our rules, but usually if we put stops at the start of w2 we can’t get good risk reward, so we are going to use 50% retracement of wave 3 as our stop loss.
Best Place to Put Targets in Wave 5
For targets you have few options, first and easiest one would be to draw fib levels from start to end of wave 4 and aim for inverse 161.8% of w.4. Second way would be to use equal legs between waves 5 and 1 as your targets.
How To Trade Wave C
Before we even start talking about trading wave C, one thing need to be clear. We are only trading wave C in Zig-Zag corrections. (Trading FLATS, TRIANGLES won’t give us good risk reward and can be tricky)
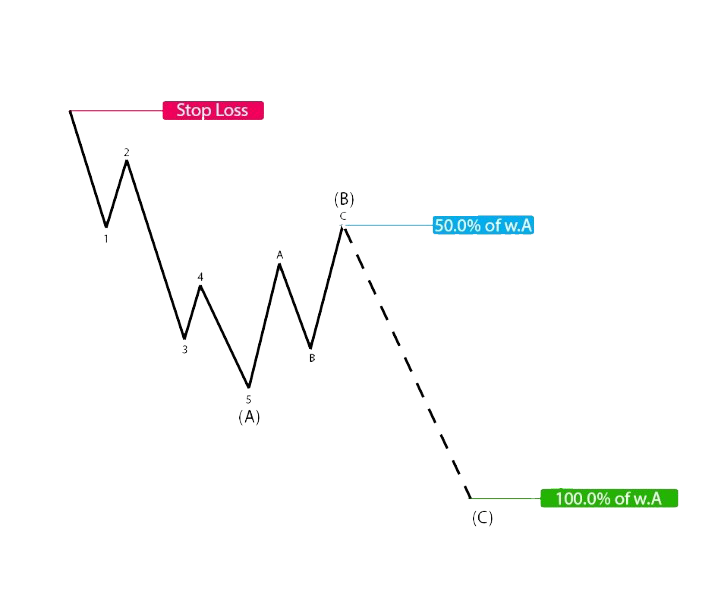
Best Place to Enter Wave C
We are going to use pullback in wave B as our setup wave, we are going to enter a trade at 50.0 % of wave A (Use F.R.T to draw fib levels).
This is only wave I prefer only one entry point, more because wave C is trading against the trend, and we all know that we should stick that trend. But if you want two entry points you can always add 61.8%
Best Place to Put Stop Loss In Wave C
Since we are trading only the Zig-Zag Wave C, we should follow the rule of wave B that will tell us this wave needs to close above/below start of wave A, so we are going to use starting point of corrective wave A as our stops loss.
Best Place to Put Targets In Wave C
Wave C is usually going to be the equal to wave A, so we are just going to use 100% extension levels of wave A as our targets. Only in case you decide to have two entry points you can add 127.2% of A as your second target.
Trading Plan Step by Step
Ultimate Trading Plan
Now let’s come and prepare full trading plan how to trade Forex & Stock market.
Step #1 – Search for Best Setups
We are not interested in every pair, every single day. You need to learn right from the start that you need to be selective as much as that’s humanly possible. Every week you should search for pairs that are moving and where you can clearly see Elliott wave pattern. (Personally I like to search for my plays during weekend, market is off so we can’t see any change and it’s always easy to find backup pair in case something goes wrong).
Our focus on this part will be to find 6-10 instruments that we are going to trade next week if you are a swing trade or just next day if you are a day trader.
Step #2 – Build Your Wave Counts
This step will be harder, but after a few weeks, everything will become easier. Start your wave count on higher time frame (swing traders 1D – day traders 4H) and check every sub-wave on the smaller time frame (swing traders check 4H – day traders 1H).
This part is all about building your wave counts and checking if we can see one of this three waves: 2, 4 or B currently developing. If you can see one of this waves, put them aside and continue with next step.
Step #3 – Prepare Your Risk Management Plan
Third step is going to be they factor that will separate you from losing traders. You need to prepare full Risk Plan for each of your trades.
Risk Per Trade – Define a percentage level of your account that you are going to risk for every trade. I can strongly suggest you use 1-2% as your R.P.T (everything higher will be bad for your trading carrier).So before every trade you can write down best size you should take to not expose your desire R.P.T level.
For each trade where we have two entry levels, just cut the risk size to half for each trade. Example: Your RPT is 1%, open 2 positions with 0.50% risk.
Risk Reward: Define minimum Risk to Reward, that will separate your idea if you should enter a trade or not. Ideally minimum RR is 1:2, and if setup that you find have RR lower than 1:2, you are going to skip thinking about that trade automatically.
Risk Per Week: Define how much level you are willing to risk every week. Idea behind this is to limit yourself from overtrading and if you ever reach your R.P.W just stop trading till next Monday. Ideal level is 5-7% and let say in the worst case scenario, you can always recover from 5% loss, but it’s hard to recover from 40% loss for sure.
This will be enough to get you started with Risk Management and you can process to next step.
Step #4 – Build Your Event Calendar
We are not fundamental traders, but I still love to know when we have some strong economic events, especially when I have trade on just to be sure I be in front of my desk when news happens.
Just go to your favourite news calendar and find news and times that you have for the setups that pass first three steps and write it down in your calendar.
Step #5 – Trade Your Plans
This step will be fun, I promise, just go and place your order and follow the previously build plan.
On the image above, we can see that we are matching 161.8% extension of wave 1 with 100% extension of the smaller 5=1 target. The zone between these two levels in our case will be a good Fibonacci resistance zone.
What Have We Learned in This Chapter…
This chapter was all about learning how to trade with Elliott Wave Theory. Try working out your trading plan and have it printed so you always know how and when to enter a new trade.
Before you move to the next chapter, where we are going to move to more advanced thing, it’s good idea to practice trading a little bit…