Welcome to Chapter Three:
Corrective Phase
Motive pattern has finished developing all five waves, so what next? Yes, next is Corrective Phase and that three-wave against the larger trend. In this chapter, we are going to cover all patterns that can appear in the market when trend is correcting and making a path for investors to add to their positions. To make our life easier and separate Motive from Corrective Phase, we are going to label all corrective patterns with letters A-B-C.
This group has a bit more patterns, but we can separate them into two groups right away.
- The first group we are going to call simple corrections, and inside this group we have three patterns: Zig-Zag, FLAT and Triangle. Flats and Triangle corrections have few variations, but more or less everything will be the same, so no need to worry.
- The second group we are going to call advanced (complex, but I hate the word “complex”, so let’s stick with advanced), where we have only two patterns: Double- and Triple-Three.
Quick Tip: “You must learn and understand simple corrections before you continue to advanced group.”
Basic Nature of the Three-Wave Structure
Wave A – This wave starts developing only after it has completed the previous cycle, and since investors don’t want to change their view on the larger trend, wave A is usually shallow pullback that’s hard to see until it’s complete.
Wave B – After shallow pullback in wave A, people start to add into their positions and that’s why B wave is usually a deep but choppy pullback. It’s not so strange to see a re-test of the starting point of wave A in this wave.
Wave C – When B wave ends and big boys book some profits, we have sharp movement in the same direction as wave A. Surprise wave, that’s definitely the best description of wave C — all rookie trades get stopped out when this wave breaks the lows (ending point of w. A). Usually, the size of wave C will be equal to wave A.
Important Thing Before We Start!
The key to fully understand corrective patterns will be to look into smaller sub-structures; it’s always going to be the 3-wave structure against the larger trend (except triangles where we have 5w), but they are all going to have different sub-structure. I can strongly suggest you write the sub-structure of each correction on the peace of paper until you learn them.
SIMPLE GROUP
Zig Zag Corrections
We must start with Zig Zag (ZZ) correction. First off, all this is the simplest pattern you can learn from corrective structure; also, this pattern has a lot of things in common with impulsive pattern. Assuming you learned all the rules of impulsive pattern, understanding ZZ will be a piece of cake.
Zig Zag correction is built from the three-wave structure that moves against the direction of the larger trend. This three-wave move we are going to label with letters A, B, C. — Waves A and C are going to move against the larger trend, and wave B will be a small pullback in the middle.
Zig Zag Pattern Sub-Waves
- Waves A and C are going to take a shape of one motive pattern, so we are going to see a 5-wave sub-structure. Usually it’s going to be simple impulsive pattern, but it’s not rare to see an extended or diagonal wave.
- Wave B is going to be another correction, so you should see a three-wave structure.
Important: If waves A and C take a diagonal shape you need to follow this rule: Wave A can only be Leading- and wave C only be Ending-Diagonal.
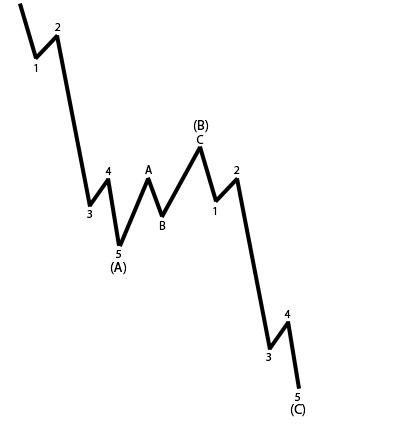
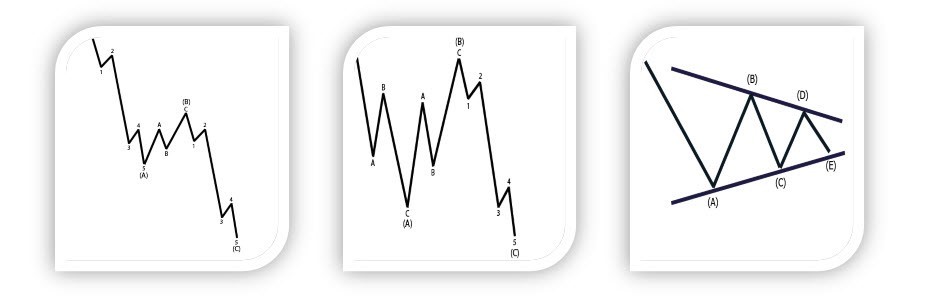
On the image above, left you can see how a Zig Zag correction should appear in the market and on the right you can see how a full Zig Zag pattern should look with all sub-waves.
Each corrective pattern to be called valid must respect a few rules, so don’t even bother skipping this part!
Zig Zag Correction Rules
Rule One: Wave B must complete below/above the starting point of Wave A.
Rule Two: Wave C must break below/above the ending point of wave A
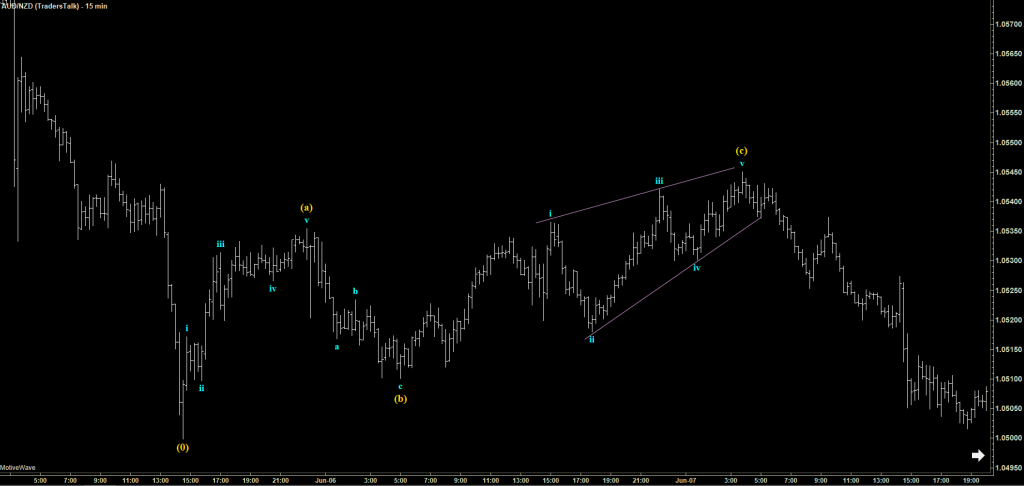
Zig-Zag Example
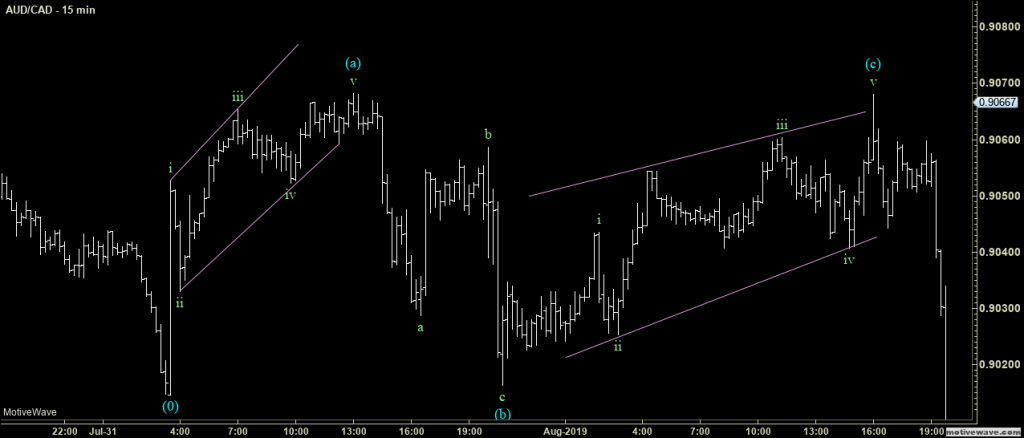
Zig-Zag Example
FLAT Corrections
FLAT corrections again are built from a three-wave structure that we are going to label with letters A, B, C. The difference between Zig Zag and FLAT will be in sub-structure, wave A of FLAT will take the shape of another correction (three-wave structure) compared to ZZ, where we have motive pattern.
You remember I mentioned at the beginning of this chapter that we can see a few variations of the same pattern? FLAT Correction is going to be the first simple pattern that can have three different variations.
FLAT Corrections Variations
– Regular FLAT
– Expanding FLAT
– Running FLAT
Sub-structure inside each one of these three patterns will look like this…
FLAT Pattern Sub-Waves
Waves A and B are going to take a shape of one corrective pattern, so we are going to see three-wave structure inside both waves. Usually, it’s going to be a simple Zig Zag correction.
Wave C is going to take a shape of one motive pattern, so we are going to see a 5-wave sub-structure. Usually, it’s going to be simple impulsive or ending diagonal pattern.
Now let’s start learning each of these patterns one by one…
Regular FLAT Pattern
Regular FLATs, or we can just say FLATs, are simple three-wave structure waves that move against the larger trend. Like all FLAT Patterns, Regular FLATs will have a 3-3-5 sub-structure.
The important thing in this FLAT correction, as well as in all other variations, will be wave B. After the first 3-wave down/up, wave B is going to be a deep pullback; for us to call a Regular FLAT valid, we must see the end of wave B equal or higher to 90% of wave A (in FX market 78.6 of wave A).
To get a full picture of how Regular FLATs appear on the chart, check image below.
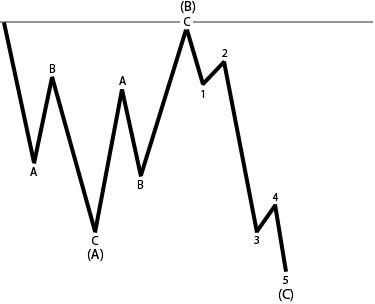
Regular FLAT Rules
Rule #1 – Wave B must retrace at least 90% of wave A, but must hold the starting point of wave A (100% of wave A)
Rule #2 – Wave C must break below the ending point of wave A.
Expanding FLAT Pattern
Expanding FLATs are second variation in this pattern. This variation of FLAT pattern will have the same number of waves and sub-waves as Regular FLAT, the difference is going to be again in that B wave.
After the first three waves in A, wave B breaks the starting point of wave A and pushes a few points before the price drop in wave C. When B wave breaks 100% of wave A, we are going to watch for inverse 127.2 – 161.8 of wave A as a potential ending point.
To get a better picture of how this pattern should look on your chart, check the image below.
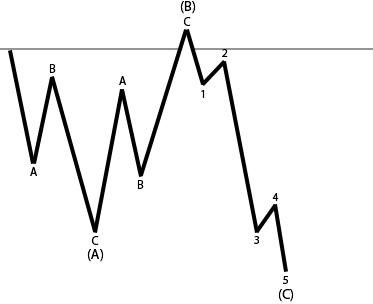
Expanding FLAT Rules
Rule #1 – Wave B needs to break the start of wave A, but can’t end above inverse 161.8%.
Rule #2 – Wave C must break below the ending point of wave A
Running FLAT Pattern
Running FLAT is the final variation we can expect to see from this pattern. Just like Regular and Expanding FLATs, this pattern is again going to take a shape of the three-wave structures that have a smaller 3-3-5 sub-wave count.
Wave B inside Running FLATs is going to follow the Expanding FLAT idea and break that starting point of wave A before wave C starts… In this pattern, the key thing is final wave C. Wave C in Running FLAT ends above/below ending point of wave A, so we don’t actually get that third wave break like we have in Expanding FLATs.
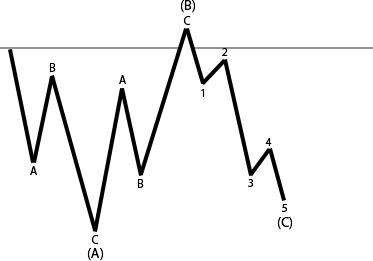
Running Flat Rules
Rule #1 – Wave B needs to break the start of A wave, but can’t end above inverse 161.8%.
Rule #2 – Wave C must break above the ending point of wave A.
Simpler approach: how to learn differences between three FLAT corrective patterns.
Waves A, B, C are always going to have a 3-3-5 sub-structure, they will always retrace 90% of wave A, and wave C will always be a motive wave. Don’t try to break your head over this, simply always target that 90% as your ideal target and, once you see end of wave B, you can start making separation. If wave B’s end ended below the start of wave A, you are in Regular FLAT, and if wave B ended above the starting point of wave A, we can see Expanding or Running FLAT. Running FLATs are a rare pattern, so you can just wait for Expanding.
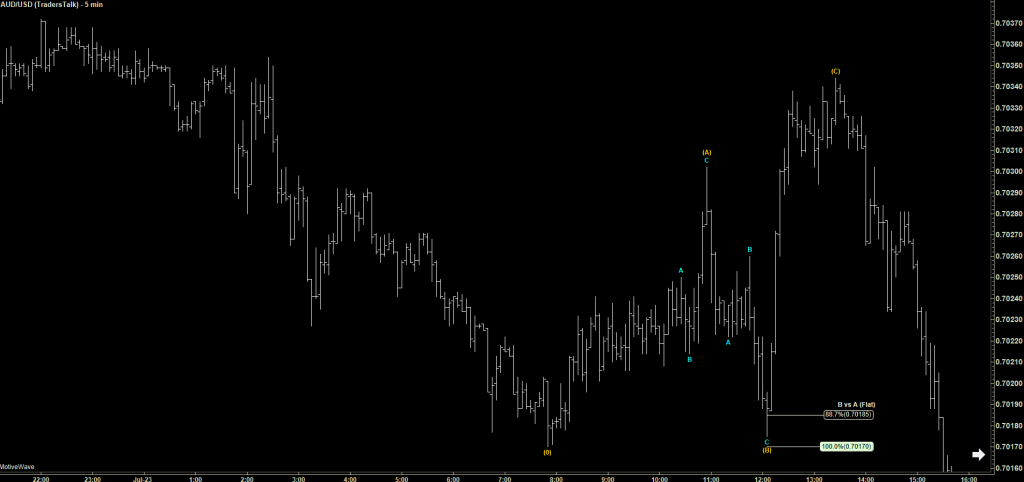
Flat Example (Bull Market)
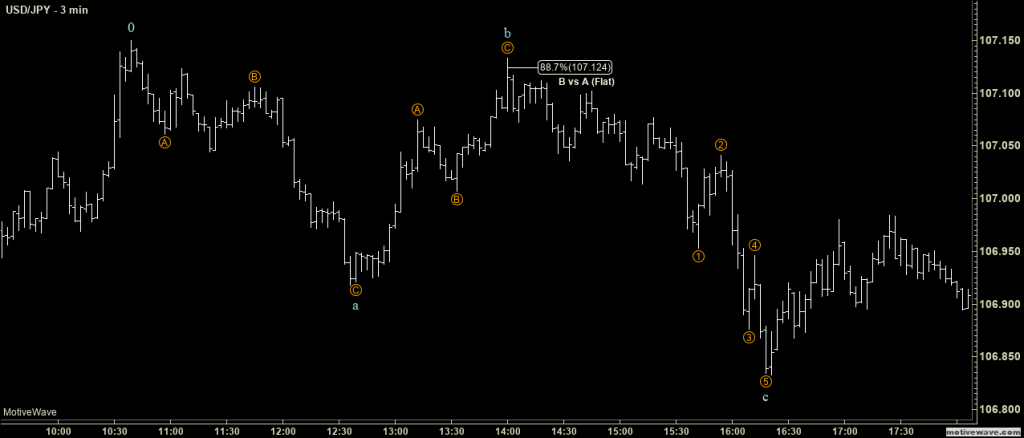
Flat Wave Example (Bearish Market)
Triangle Corrections
Triangles are the final pattern from the simple corrections group, this type of pattern is probably going to be easiest to spot on a chart; they have a lot in common with basic triangles that everyone already knows (assuming that you know basic technical study), but with a few improvements. Instead of a three-wave structure, triangle patterns are going to have the five-wave structure that we are going to label as A, B, C, D, E.
Triangles are patterns that appear in the middle and ending stages of a trend — whenever you see narrowing market movements where each leg is shorter than the previous one, you are going to be able to fit Elliott Wave Triangle pattern.
Triangle Pattern Sub-Waves
Each leg of the Triangle pattern will sub-divide into a smaller correction, so inside waves A-B-C-D-E, you are going to see a 3-3-3-3-3 structure. Usually, each leg of the triangle will take a Zig Zag shape.
On the image above, you can see how a Triangle pattern look with all sub-waves included.
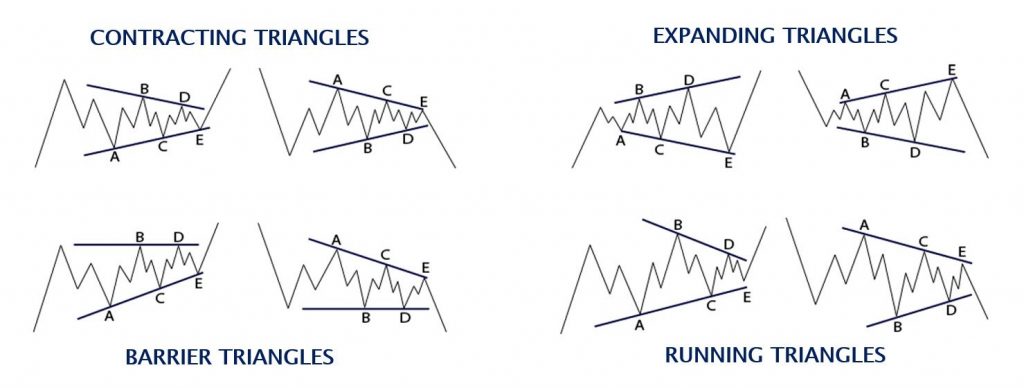
Just like FLAT correction, we have a few different variations in the shape of a triangle, but all of them have five-waves and each leg is going to be a smaller a-b-c.
Triangle Corrections Variations
– Contracting Triangles
– Expanding Triangles
– Barrier Triangles
– Running Triangles
Let’s now take a closer look at each of these four patterns.
Contracting Triangle Pattern
Contracting Triangle is the first Triangle pattern that we are going to take a look at. This triangle is built from a five-wave structure that moves in the direction against the larger trend. Each of these five-waves (A-B-C-D-E) is going to be shorter than the previous wave, so wave A will be the longest pattern and wave E the shortest pattern.
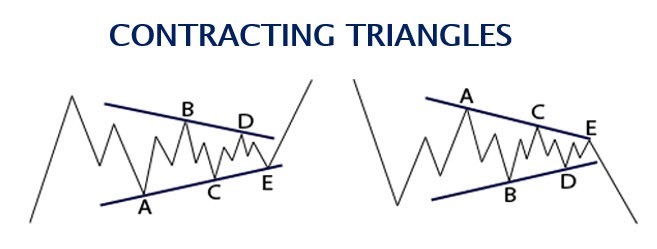
Contracting Triangle Rules
Rule #1 – Wave B must be smaller than wave A.
Rule #2 – Wave C must be smaller than wave B.
Rule #3 – Wave D must be smaller than wave C.
Rule #4 – Wave E must be smaller than wave D.
Expanding Triangle Pattern
Expanding Triangle is just a mirror version of Contracting waves, so again we have a five-wave structure, and again we can see waves trading against the larger trend, but over here each leg will be larger than the previous one.
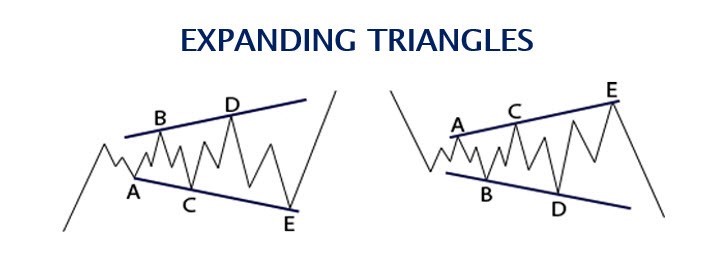
Wave A will be shortest and wave E the longest waves in Expanding Triangles. Expanding Triangle Rules
Rule #1 – Wave B must be larger than wave A.
Rule #2 – Wave C must be larger than wave B.
Rule #3 – Wave D must be larger than wave C.
Rule #4 – Wave E must be larger than wave D.
Barrier Triangle Pattern
The third Triangle variation we have is Barrier Triangle pattern. This type of triangles is similar to Contracting in a lot of ways; most important, like any Triangle pattern, we have the five-wave pattern (A-B-C-D-E) and each leg is going to be a smaller three-wave pattern (A-B-C-D-E). Wave A is going to be the longest wave and each next leg will be smaller than the previous one.
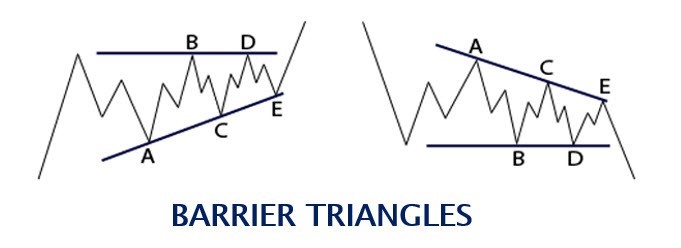
The only difference in Barrier pattern is wave D, which will end around the same price action as wave B, that’s why breakouts after Barrier Triangles are stronger and faster.
Barrier Triangle Rules
Rule #1 – Wave B must be smaller than wave A.
Rule #2 – Wave C must be smaller than wave B.
Rule #3 – Wave D must be smaller than wave C.
Rule #4 – Wave E must be smaller than wave D.
Running Triangle Pattern
Running Triangle is the final pattern from this group. Structure and shape of this triangle is going to match mostly Contracting Triangle pattern. We have a five-wave structure (A-B-C-D-E) that has smaller three-waves inside (A-B-C).
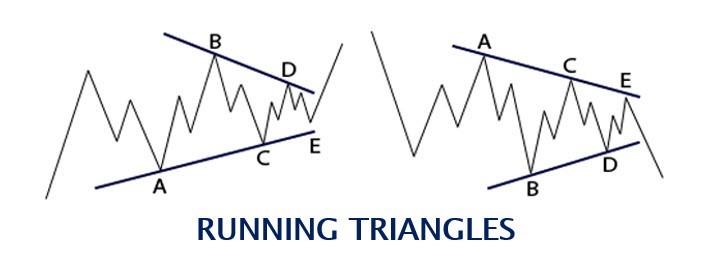
The key difference between Running and all other Triangle patterns is wave B: over here, wave B will end above/below the starting point of wave A. This happens, usually, in wave 4, due to some economic event, but each other wave —C, D, E — will be smaller than the previous one.
Running Triangle Rules
Rule #1 – Wave B must break the starting point of wave A.
Rule #2 – Wave C must be smaller than wave B.
Rule #3 – Wave D must be smaller than wave C.
Rule #4 – Wave E must be smaller than wave D.
Quick Tip About Triangles
Triangle patterns appear only inside the wave 4, B and X. Also, from the four variations that we have, the Expanding one will rarely appear and the other three are more or less similar, so you shouldn’t pay so much attention to guessing if you are in Running or Contracting or Barrier Triangle; everything is going to play the same at the end.
Practice drawing Triangle trend lines — in almost all triangles, you can connect the trend line between waves B – D and the trend line between A — C. Practicing drawing this will help you to later label your counts and also, the trend lines can become a good support, resistance area.
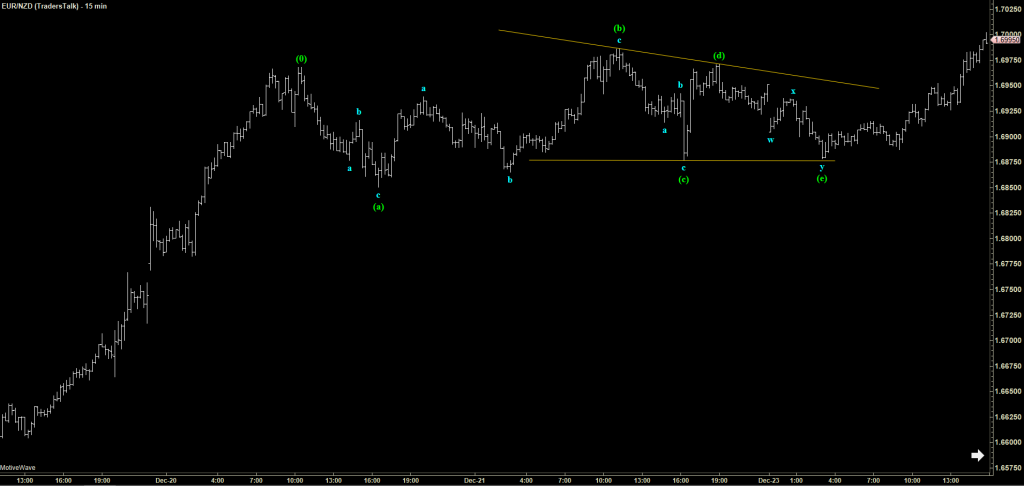
Triangle Example
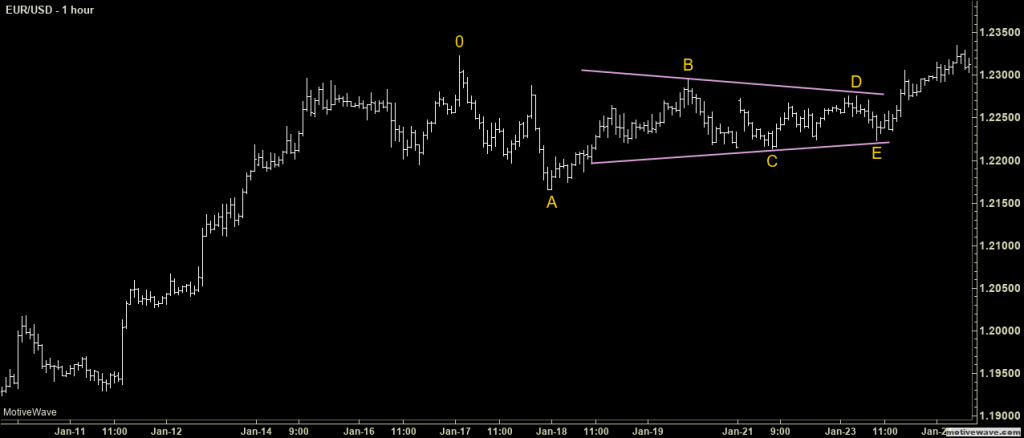
Triangle Example
Advanced Corrections
Since the market won’t always play nicely, we are going to see some choppy movements in correction that will be:
Advanced corrections only have two patterns: double- and triple-three, but each of these waves can have a few variations, so that makes them hard. In the simplest terms, inside double-three correction, you have two simple corrections moving in the same direction and another simple correction in the middle that represents a pullback, and triple-three are a group of three simple corrections forming in the same direction, with two additional simple corrections in the middle. Even easier to say Double-three has 3 simple corrections and Triple have 5 simple corrections inside….
Now let’s talk about each pattern separately and let’s learn the rules…
Advanced Group
Double-Three Corrections
Double-Three pattern is again a three-wave move that moves against the larger trend, but here each leg will take a shape of correction, so you are going to have A-B-C, A-B-C, A-B-C, and to separate this from simple corrections we are going to label this type of patterns with letters W-X-Y.
Double-Three Pattern Sub-Waves
- Wave W is going be the first three-wave structure pattern. Usually, it’s going to take the shape of Zig Zag, but wave W can also become FLAT or another Complex Correction.
- Wave X is the second three-wave structure pattern that will usually be Zig Zag or Triangle, but we can also see FLAT correction.
- Wave Y is the final three-wave structure, and it’s usually going to be Zig Zag or FLAT pattern, but we can also see Triangle, in case wave X didn’t already form that pattern.
Important: Each leg of the Double-Three Correction can take a shape of another, smaller Double-Three pattern, and I strongly suggest that you don’t over force this ability, since you are just going to have two potential paths towards how this advance correction is going to end.
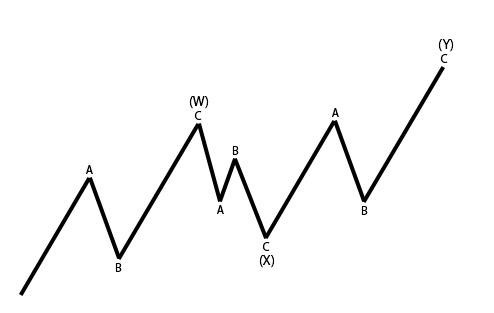
On the image above-left, you can see how Double-Three pattern should look on the chart, including all sub-waves.
N. Elliott didn’t give us too many rules about this group, but we are going to add a few rules just to reduce Elliott Wave Theory subjectivity.
Double Three Correction Rules
Rule #1 – Wave X must end above/below the starting point of wave W.
Rule #2 – Wave Y must end above/below the ending point of wave W.
Triple-Three Corrections
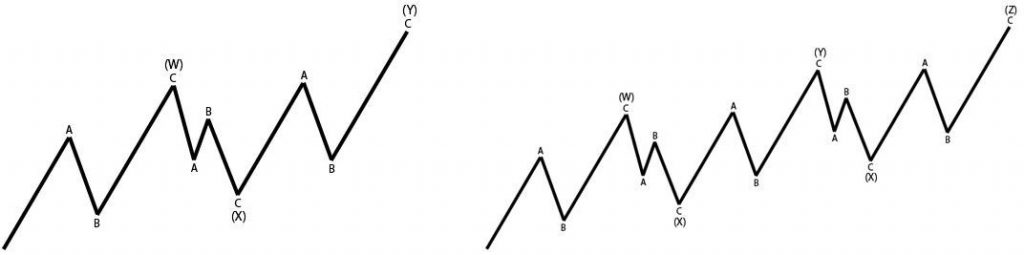
The Triple-Three pattern is the final pattern that we need to learn from the Elliott Wave corrective phase. This is the second pattern from this group that is built from a five-wave structure that moves against the larger trend. We are going to use labels W-X-Y-X-Z to label this type of correction.
Triple-Three Pattern Sub-Waves
Wave W is going be the first three-wave structure pattern, and it’s usually going to take a shape of Zig Zag, but wave W can also become FLAT or another Complex Correction.
– Wave X is the second three-wave structure pattern that will usually be Zig Zag or Triangle, but we can also see FLAT correction.
– Wave Y is the final three-wave structure, usually it’s going to be Zig-Zag or Flat pattern, but we can also see Triangle, in case wave X didn’t already form that pattern.
– Wave X is the second three-wave structure pattern that will usually be Zig Zag, but we can also see FLAT or Triangle correction. (Triangle only if there wasn’t any pattern already.)
– Wave Z is the final three-wave structure, and it’s usually going to be Zig Zag or FLAT pattern, but we can also see Triangle, in case wave X didn’t already form that pattern.
Important: Each leg of the triple-three correction can take a shape of another, smaller double-three pattern, and I can strongly suggest that you don’t over force this ability, since you are just going to have two potential paths towards how this advance correction is going to end.
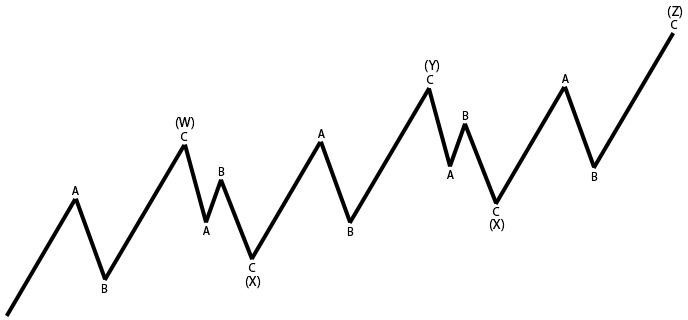
On the image above-left, you can see how double-three pattern should look on the chart, including all sub-waves.
Triple-Three Correction Rules
Rule #1 – Wave X must end above/below the starting point of wave W.
Rule #2 – Wave Y must end above/below the ending point of wave W.
Rule #3 – Wave X2 must end above the starting point of wave Y.
Rule #4 – Wave Z must end above the starting point of wave Y.
Quick Tip About Triple-Three
Triple-three correction have a lot of similarities with Ending Diagonal pattern; in case you see ED developing against the larger trend, there is more than a good chance we are building triple-three. Also, another good tip would be to look when wave 3 becomes the shortest wave in any motive pattern, that’s when you can easily fit W-X-Y-X-Z inside.
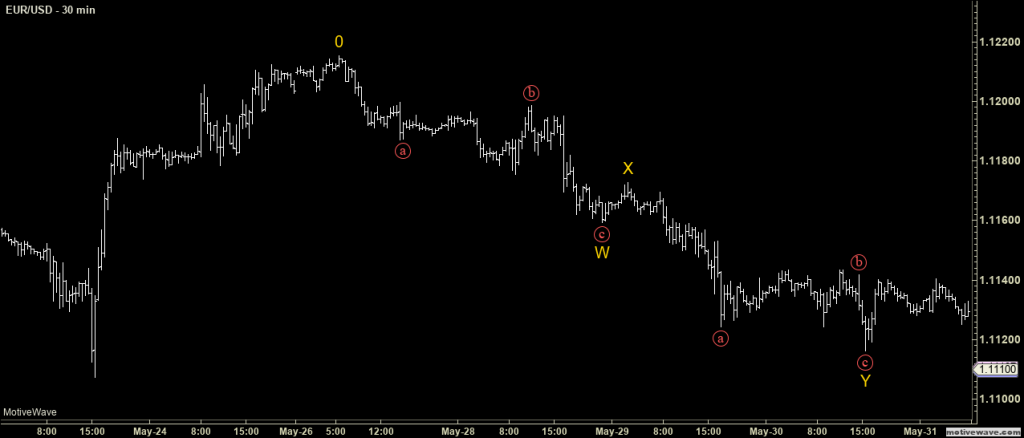
Double Three Example
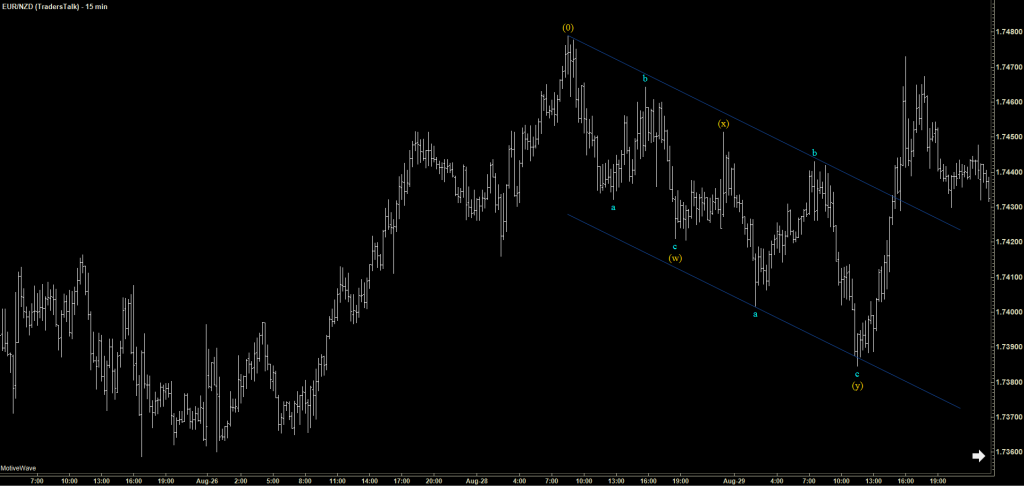
Triple Three Example
What Have We Learned In This Chapter…
We definitely have many more patterns to understand and many more rules in Corrective Phase, but it’s OK, this is more or less everything you need to learn from patterns R. N. Elliott discovered, and everything from the next chapter will be easier…
Still, I can strongly suggest that you practice a little bit before you move to the next chapter. Try to find at least five Zig Zag corrections, five FLAT corrections and five Triangles.
Don’t bother with advanced patterns (Double and Triple Three) yet, since I’ll give you a trick soon to help you spot them easier — plus, you need to be sure you fully understand simple corrections first.